Showing posts with label workshop. Show all posts

1 July 2013

Rubies and pearls


Gem brooches with sapphires, rubies, garnets and pearls.

Some projects with precious stones and pearls are taking much more time then I would ever imagine. But the way from choosing an object, untill a finished item is a long way.
The most tricky part is the gems. Finding a write type od stone, shape, size, colour and quality that will not ruin the budget takes time. 
For this little brooch I ordered pearls three times before I got the right ones.

 
But let me guide you thru a whole process.

First choose your jewel and find, as many photos, drawing and information about it, as possible. Sometimes it requires a  visit at the museum and making some extra photos from different angels to have enough material to start in the workshop.
I probably will end up with  buying some extra museum catalogues and publications ( you can never have enouth of them! ).

This time I have chosen the brooch from the Erfurt treasure, small elegant with a pin type that is easy to put on the thick textile like a felt hat or a woolen houpelande.
I havent been at the museum in Erfurt yet, but the is a very detailed caltalouge from the exhibition that gives me all the details I need.


The next stage is  finding the right measurements. That you get for the museum database item descriptions or you need to estimate it by your own.
 Making several templates from paper or brass to make sure everything is right, before cutting the metal parts in silver.


All elements are done and fitted together.

 Now the I can finally start in my workshop. Cutting and constructing all elements.
At this stage I already need to have all the stones and pearls. When I am sure that all parts fits together I may solder it to one piece.


  A silver brooch base after soldering and cleaning in the acid.

To set a stone I need to make a tight bezel and after inserting a stone press it tightly around with a polished steel tool.
 Pearls are bit more problematic. If I plan to gold gild the brooch I cannot install the pearls - they are to delicate to survive the acid bath which is used for galvanic gilding. That means I need to rivet it as the very last stage of making the jewel.

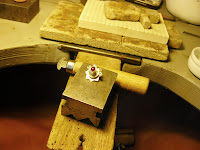
  
Hammering the rivets on back of the pearls requires a steady hand - be sure you hit the metal 0.7mm rivet not the pearl, otherwise you wil need to start all from begining.


Making the first item is always a long process. Next ones can be made much quicker as I do not need again that much time for reaserching, setting measurments and making templates.

But for me whole this stage is the most chalenging and exciting. All those preparation before I even sit in the workshop are the most imoportant and will affect the final look of the project.
The rest is just precision, steady hands and some hours playing with metal: sawing, filing, drilling, soldering, polishing, stone setting, riveting...

30 June 2013

Silversmithing in Middelaldercentret

The course I took in Fredericia was in April. It took me some months to complete a small set of  tools to be able to start working with the new technique in a medieval workshop.
 I got really lucky, an old silversmith has presented me some old tools. Some of them I could with out any adjustments use in the workshop, some needed a bit of work to make them look like thoes from the iconography.

A small anvil, a stake for rising the vessel and two hammers, one made of steel and the second made of horn.


Here is some more photos:

Get Adobe Flash player

Taking a course in silversmithing.


As I was browsing the images of the workshops from the Middle ages I could often see some silversmith work, beside of making smaller jewels.
A late 15th century workshop by the Master of Bileam showing St Eligius at work

It seems that the goldsmith and silversmith was actually a same craft in Middle ages.

 Than if I want to call myself a medieval goldsmith, there is no choice but grab a hammer and shape some vessels.
St. Eligius at work by Niclaus Manuel 1515


Good for me that Denmark is still a place where silversmithing craft that is doing quite well and it is still a part of the "precious smiths" training.

I took the trip to Fredericia one of the schools for goldsmiths to take part in a course.
Two weeks with different types of hammers. anvils, stakes, mallets etc.


Get Adobe Flash player

It was a great fun!
But honestly I did not imagine that this is such a slow process.

Shaping a vessel takes days or even weeks and hundreds of thousands of hammer strikes. Than there is still some more hammering with the planishing hammer to smooth and polish the surface.
I also discovered that it has much more similarities to armour-making than I thought. Good I do not have to work with a glowing-hot metal to shape it.

Now I need to introduce this technique to my medieval workshop.

30 September 2012

Repousse work and a mixture called tenax.

A few examples of the repousse work I made recently.
I am experimenting with new a technique called repousse. Using punches - polished, blunt steel tools, the image is hammered down and pressed in to a metal foil. 

It was used to produce a light weight metal ornaments which where sewn on dresses and church textiles.

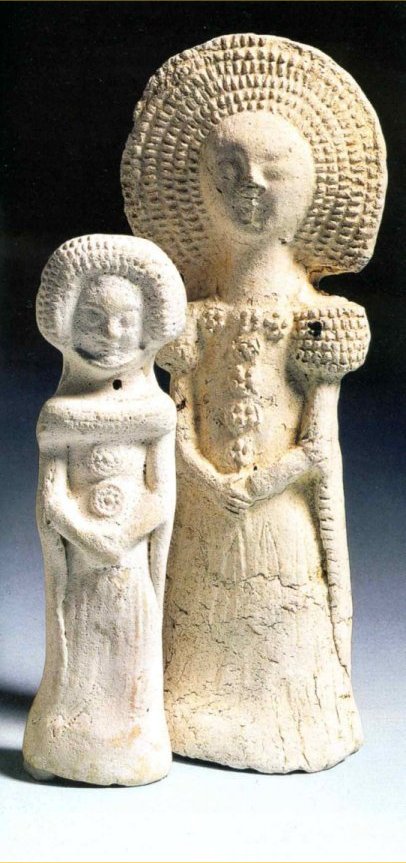
14th century clay "dolls" from Nuremberg (Germany) with big floral metal ornaments.

14th and 15th century dress ornaments.
Silver-gilt and copper-gilt.
Kloster St Andreas, Saren, Switzerland.
Those are sewn on a dress made for a statue imaging  the Jesus as a child.


But first things first. The metal foils is fixed on the black mixture, which the Monk Teophilus calls tenax.
In his manuscript "Diversarum Artium Schedula" from 12th century he gives the recipe for preparing it:

"Grind a piece of brick or roof tile very small (fine), 
and melt some pitch in am earthenware pot and add little wax.
 These being melted together, mingle the powder of the tile, and stir it strongly 
and pour it in water. And when it has begun to grow cold,
 dip both hands into the water and macerate it for long time,
 until you can extend and draw out this composition like a skin.
 You instantly melt this composition and will fill the vial to the top. (...)"
 - from Chapter LIX
Components ready to be melted. Some brick powder, resin, pitch, and wax (not on the photo).

Part of the original  Pages in the manuscript "Diversarum  Artium Schedula"  from Vienna.

I tired this recipe, but than I decided to add also some resin to improve the elasticity and than it was perfect. Probably if I would be working in a cooler temperature the resin would not be needed, but as I was working with it in the middle of the summer, extra resin made a huge improvement.

But what makes this composition such a good base for the working with a metal foil ?
There are several reasons:
First, when heated close to the fire it become liquid and sticky, so the metal can be easily fixed on the surface (you can also heat up the metal piece and melt it into the pitch).
It holds and stabilize the metal while working and give an elastic base to press the image down.
Secondly, it is hard enough to give a good resistance and elastic in the same moment.
Finally, what is also impotent it burns away totally which makes cleaning of the work much easier and quicker.
 Only a thin coat of brick powder remains on the surface, you can brush it away or add a few drops of water and use as a cleaning/polishing compound to bring some light to your work
A wooden board with tenax and some tenax rods for future projects.
 When the mixture is ready I pur it on the wooden board. I make 4-5 layers waiting until each one cools down before putting the next one.
I prepare the metal pieces and heat them in to the fire until they glow red, to make them softer and easier to work with.
Cutting copper disc with copy of the shears from the Mastermyr find.

If the image is deep, there might be a need to heat it again to avoid braking it while stretching. To do that,  put a glowing piece of charcoal over the metal and blow gently. That will make the metal piece warm enough to be easily removed from the pitch.
Starting with a sketch and making the border decorations.
I use steal punches to hammer the image on the foil. I work on the reverse side so it is important to check from time to time how it look also on the front side.
Close-up to the reverse side.
Avers side of the ornament, and an its image left in pitch.
Big flowers are going to be sew on a surcot, a type of dress,
 as button-like ornaments, are based on a find from Salzburg (Austria).
Smaller ones are based on a design from the bronze matrix found in Norway.
Already with little holes for sewing them on.
Workbench view.

The photo of the original find from the Salzburg Treasure.
 That was a very interesting project, not only because I had to learn a totally new goldsmith technique, it was mostly because it's a link connecting goldsmith work with a textile projects with are made in the Middelaldercentret. Two different techniques but both have the same purpose - showing the status of the owner as much as satisfying the aesthetic needs.

It also made some visitors of the museum revise their point of view on a goldsmiths work in Middle Ages, and realize that what we call now "jewellery" is quite a modern concept,
 and that it differs from a medieval point of view.

There spectrum of products made by goldsmiths where much wider: dress ornaments, buttons, hook-and-eyes, buckles, metal beads where as important as rings and brooches and pendents. Also the metals that goldsmith use was not only gold and silver as it is now. Gilded copper and bronze was extremely popular, because it made a similar efect when weared but was much cheaper to produce.

I surely going to work more with repousse. It gives a great effect and I am able to produce pieces which can be so complex but still feel very delicate and pleasant to wear.
They can be used stitched on the textiles, riveted on a leather as belt ornaments,  hammered on a chests covered with velvet, used for book covers, or as an element of even more elaborate works.
All that will be gilded with gold and sew on a new priest dress for Middelaldercentret.


Bibliography:

Theophilus: An essay upon various Arts in three books by Theophilus, called also Rugerus, priest and monk forming an Encyclopaedia of Chritian Art of the eleventh century. Translated, with notes by Robert Hendrie, London 1847.

Theune, Claudia: Der mittelalterliche Schatzfund aus der Judengasse in Salzburg. In Ars Sacra. Kunstschätze des Mittelalters aus dem Salzburg Museum. Jahresschrift Salzburg Museum 53, Salzburg/Oberndorf 2010, p.

http://www.landschaftsmuseum.de/Seiten/Lexikon/Spiele-Puppen.htm
Posted by Picasa

18 September 2012

Visit in my new workshop

Today let me take you for a walk around my new workplace. We are in the year 1402 in the town Sundkøbing. It is a trade town by the baltic sea, with a harbour, over 10 houses and a tournament field.
My house is the first one when you entering the gate, just next to the market place, and vis-à-vis blacksmith (just if need some custom tools).


Next to the house I got a big garden with vegetables, herbs and fruit trees.


My workshop is in the front room with a window coming to the main street. There you can find a small bench, anvils, hammers, tongs and cutters, punches, chemicals, metals, showcases and all the items I need to have in reach while working.


All the rest of materials I keep in the storage room. There you can find charcoal, clay, resin, wax, stone, pitch, and items I want to keep safe and locked when I am not around.


 In the backroom. There is a fireplace, table with benches. shelves with all kind of ceramics and cooking equipment. With  the ladder standind by the wall, you can climb up to the sleeping place under the rooftop. The back doors are leading to the garden.


It is not a big house, but it got everything that is needed: a working bench with some light, the fireplace. I am successively filling it up with new tools and materials to beable to make more different metalwork in the way a 15th century goldsmith would.
Posted by Picasa